
How to setup a JPA Project with a Data Connection for MySQL in Eclipse.
The tutorial below details how to setup a JPA Project in Eclipse. As part of the JPA Project creation a Data Connection to a local MySQL database instance will also be configured.
Note - This tutorial has been created using Eclipse Juno.
Step 1: Click in “File>New>JPA Project”…
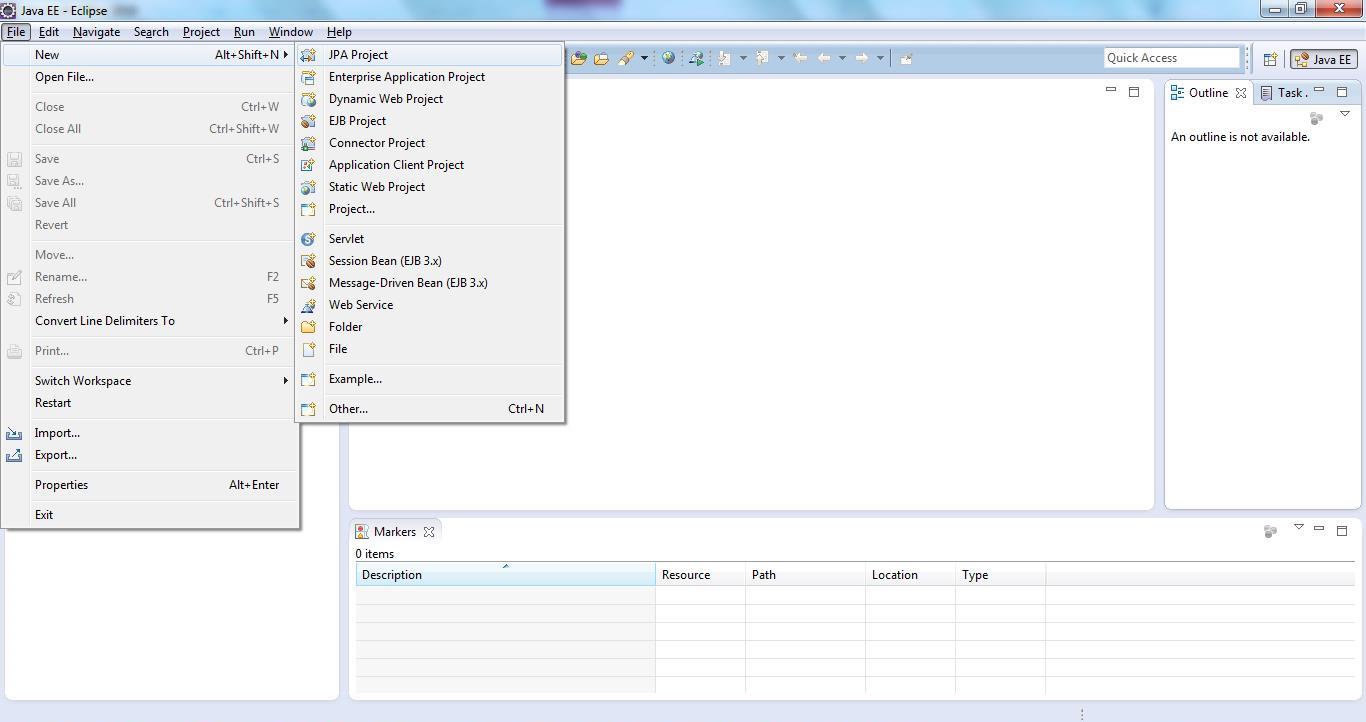 JPA Project & Data Connection for MySQL Step 1
Step 2: Enter the Project Name. Here it is entered as “StudentDeptCourseProject”. Then select the Target Runtime. In the picture below “jdk1.7.0_21” is shown as being selected. (JDK 7 is set in my windows classpath settings under the variable “JAVA_HOME”) . Then Click on Next…
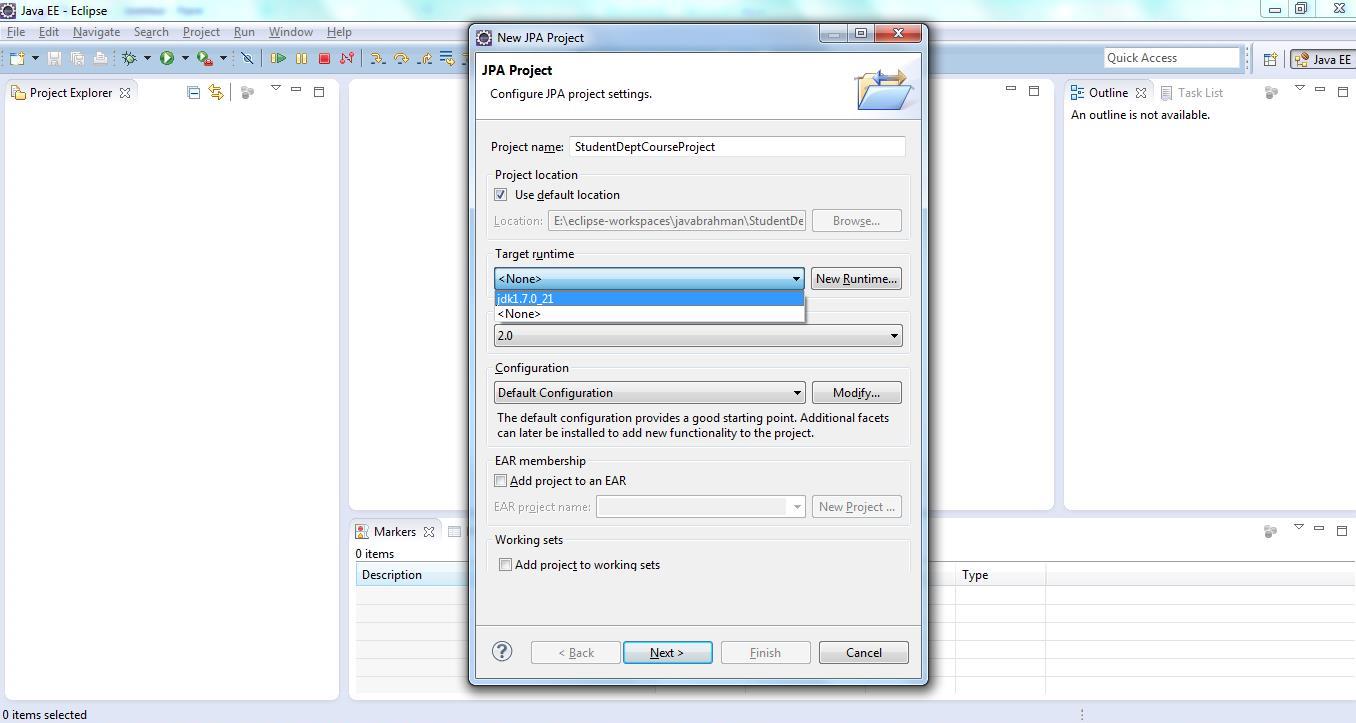 JPA Project & Data Connection for MySQL Step 2
Step 3: The below page is displayed. Click “Next” to move ahead in the wizard…
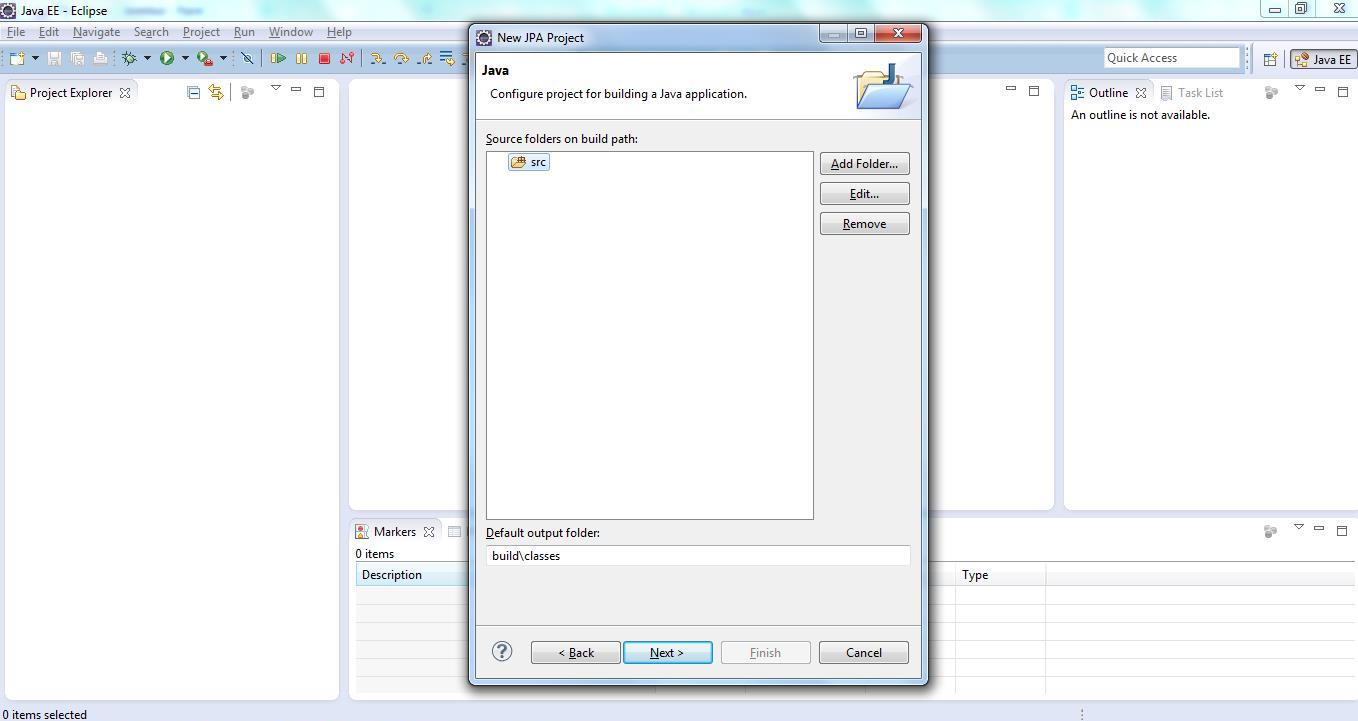 JPA Project & Data Connection for MySQL Step 3
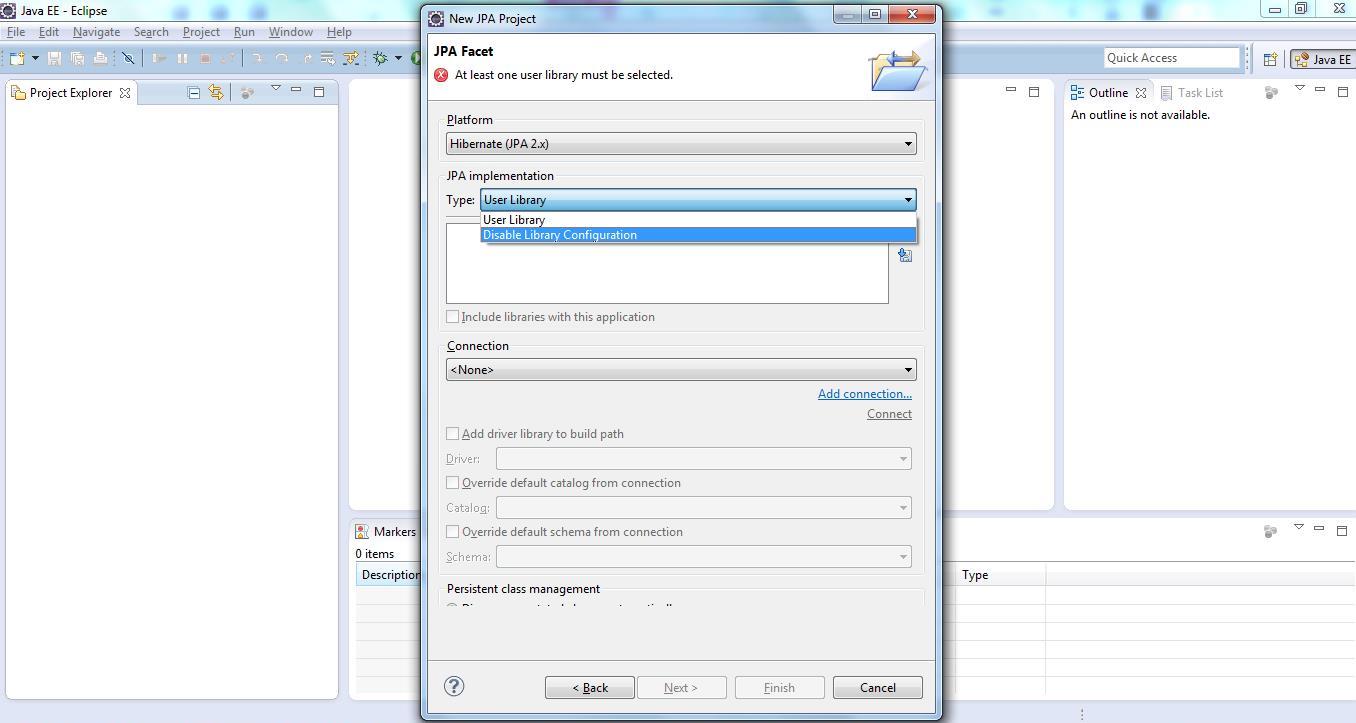
Step 4: The third page of the “New JPA Project” wizard is displayed titled “JPA Facet” as shown below...
 JPA Project & Data Connection for MySQL Step 4
Step 5: Then select the “Platform” as “Hibernate(JPA 2.x)”…
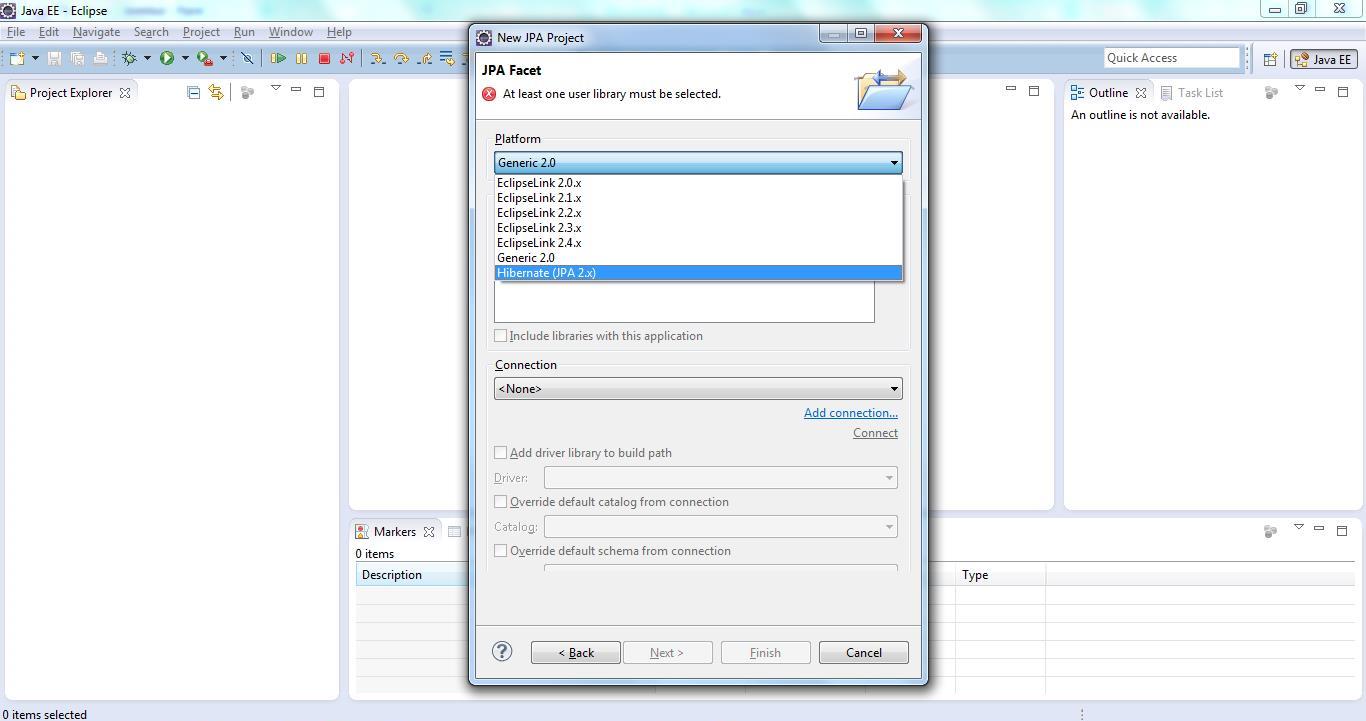 JPA Project & Data Connection for MySQL Step 5
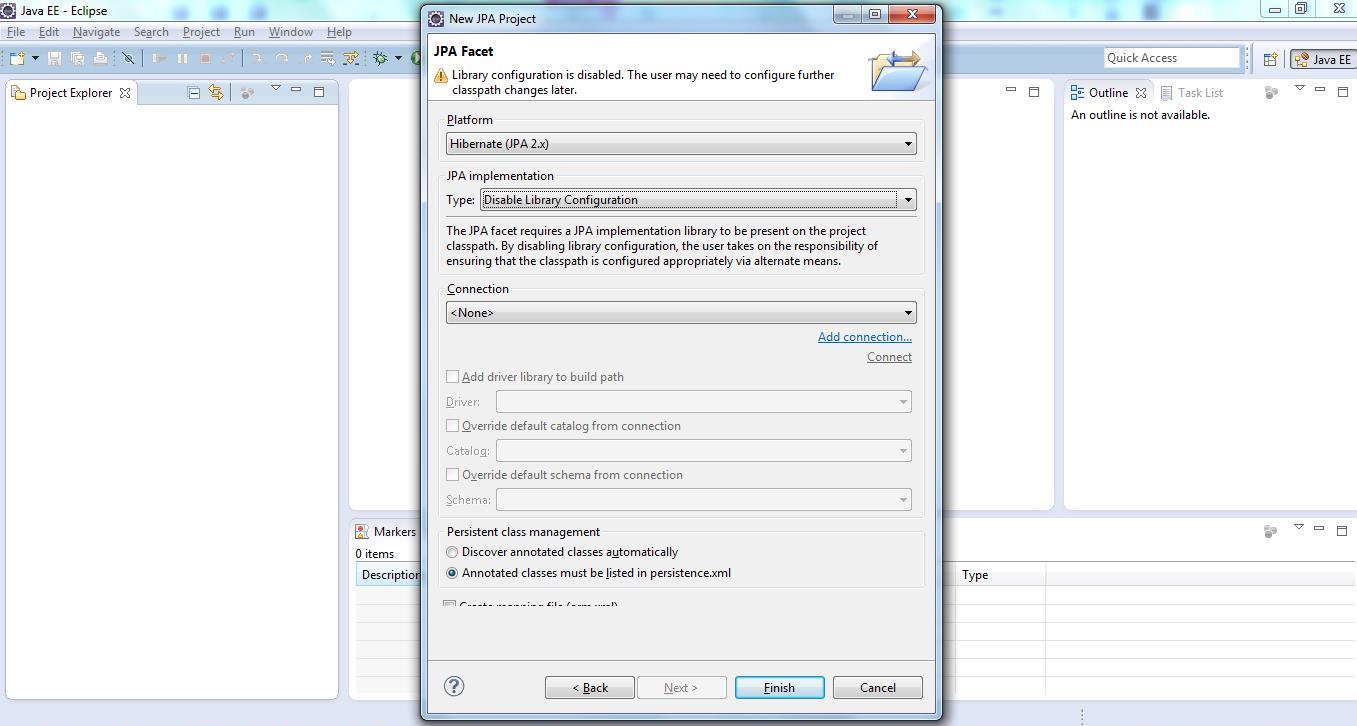
Step 6: On the below page select the “Type” as Disable Library Configuration. This will remove the error shown on the top saying “At least one user library must be selected”
 JPA Project & Data Connection for MySQL Step 6
Step 7: The following page is displayed. On this page click on “Add Connection” link below the “Connection” dropdown…
 JPA Project & Data Connection for MySQL Step 7
Step 8: The following “Connection Profile” page is displayed…
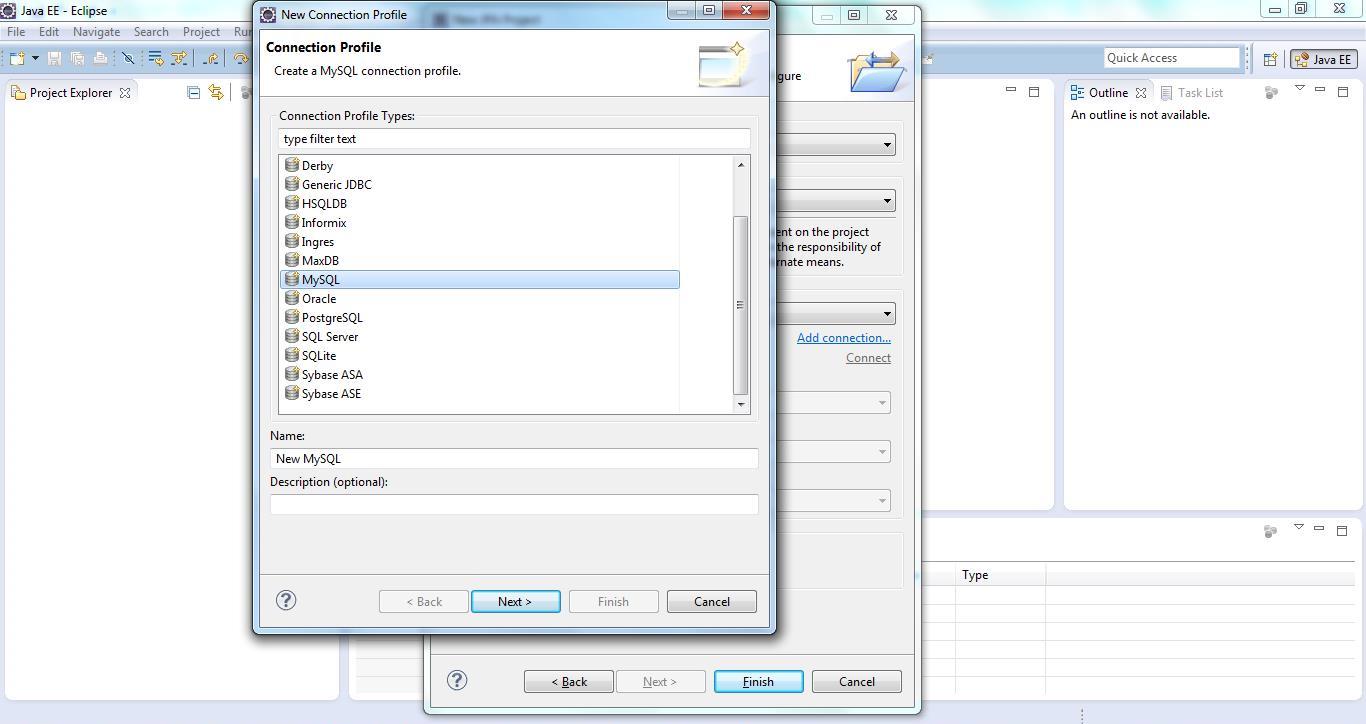 JPA Project & Data Connection for MySQL Step 8
Step 9: Select ‘MySQL’ and click ‘Next’
 JPA Project & Data Connection for MySQL Step 9
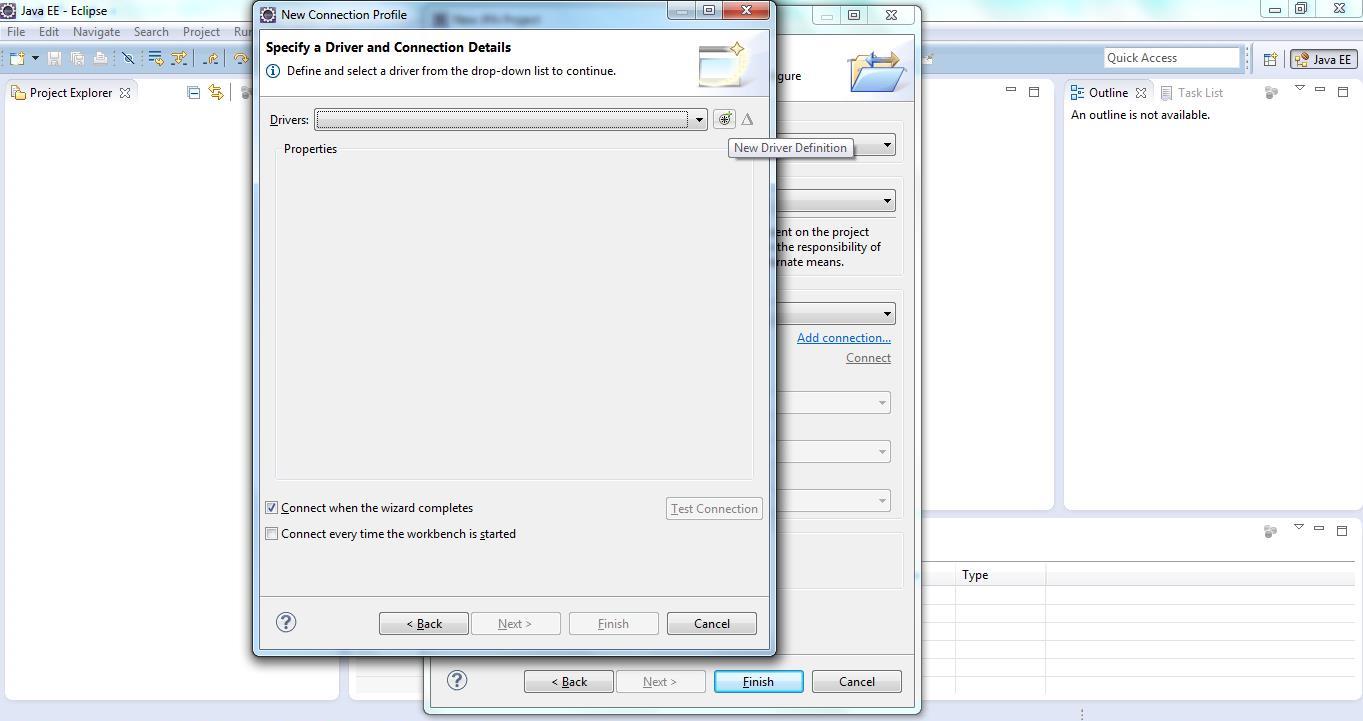
Click ‘New Driver Definition’
Step 10: Select MySQL JDBC Driver with System Version as 5.1. Then go to the “JAR List” tab in the same wizard window…
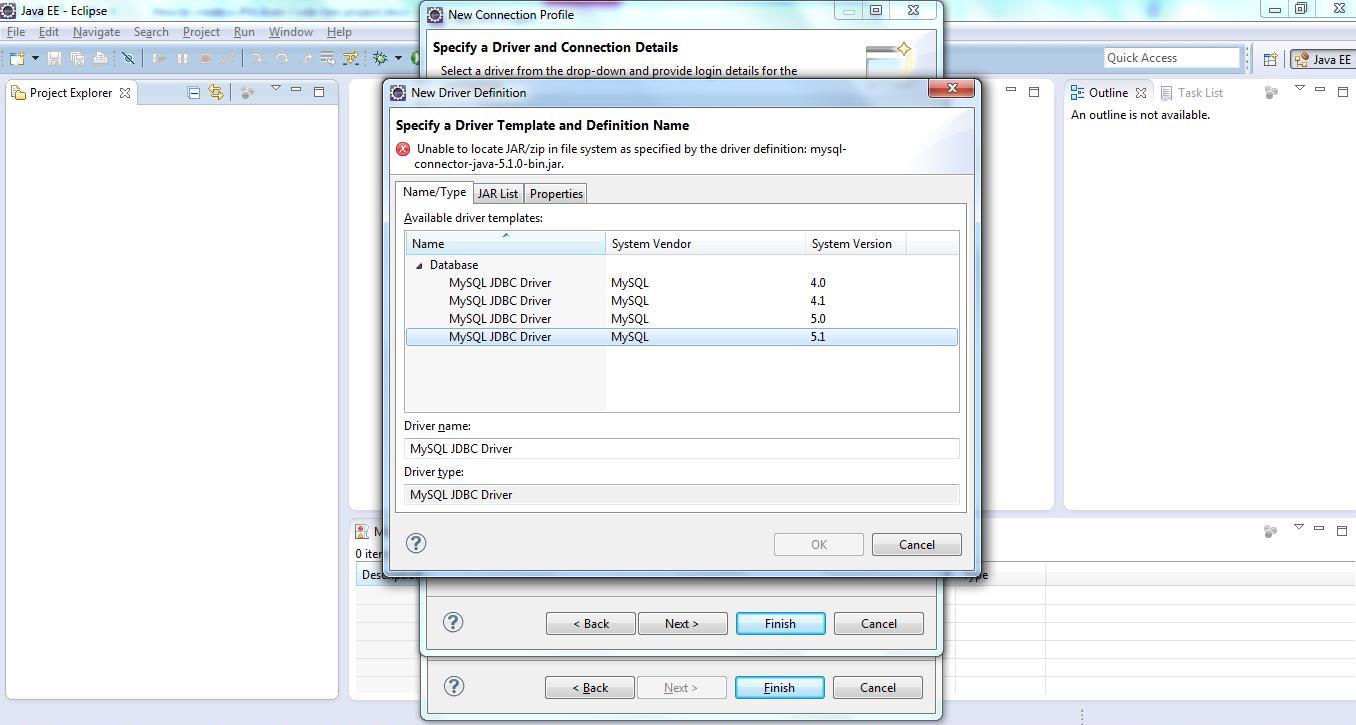 JPA Project & Data Connection for MySQL Step 10
Step 11: Click on “Add JAR/ZIP”…
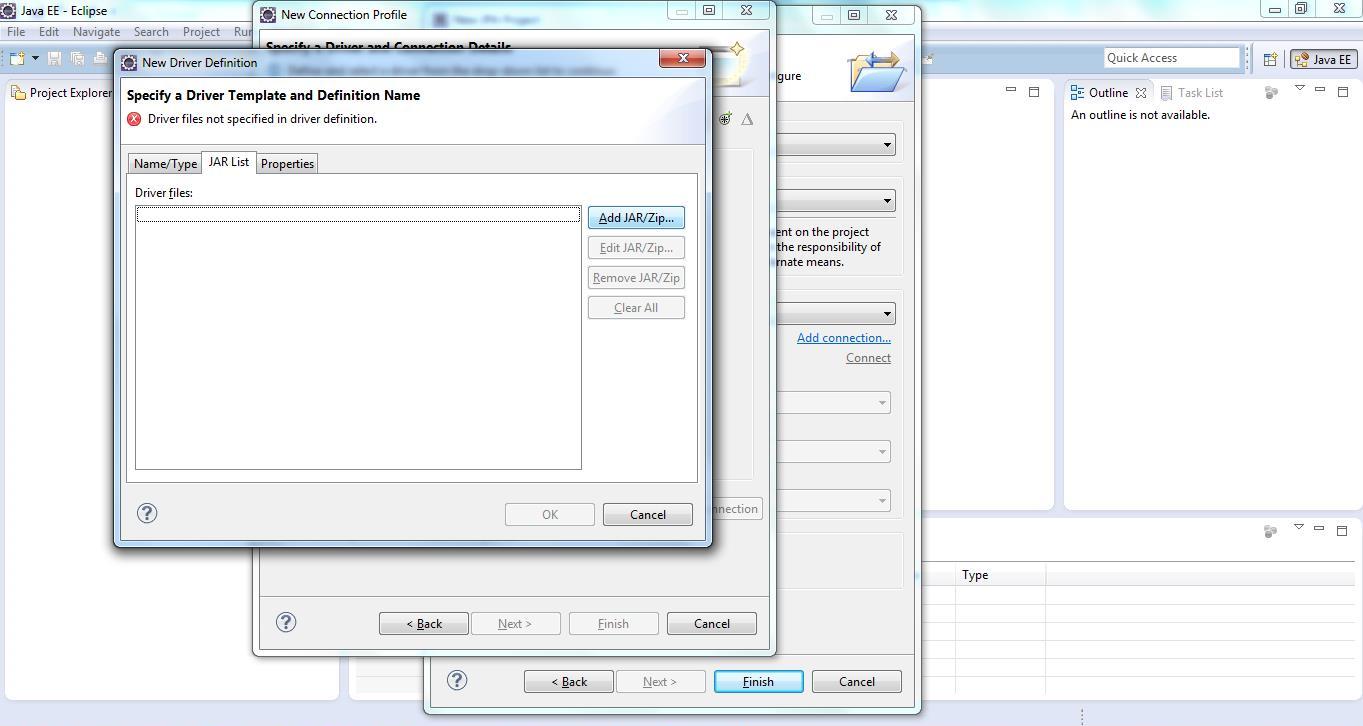 JPA Project & Data Connection for MySQL Step 11
Step 12: Browse to the location where you have the MySQL 5.1 driver in your system. I have the MySQL 5.1 driver downloaded as a project dependency in my Maven (.m2) local repo. Select the “mysql-connector-java-5.1.10.jar” and click “Open”…
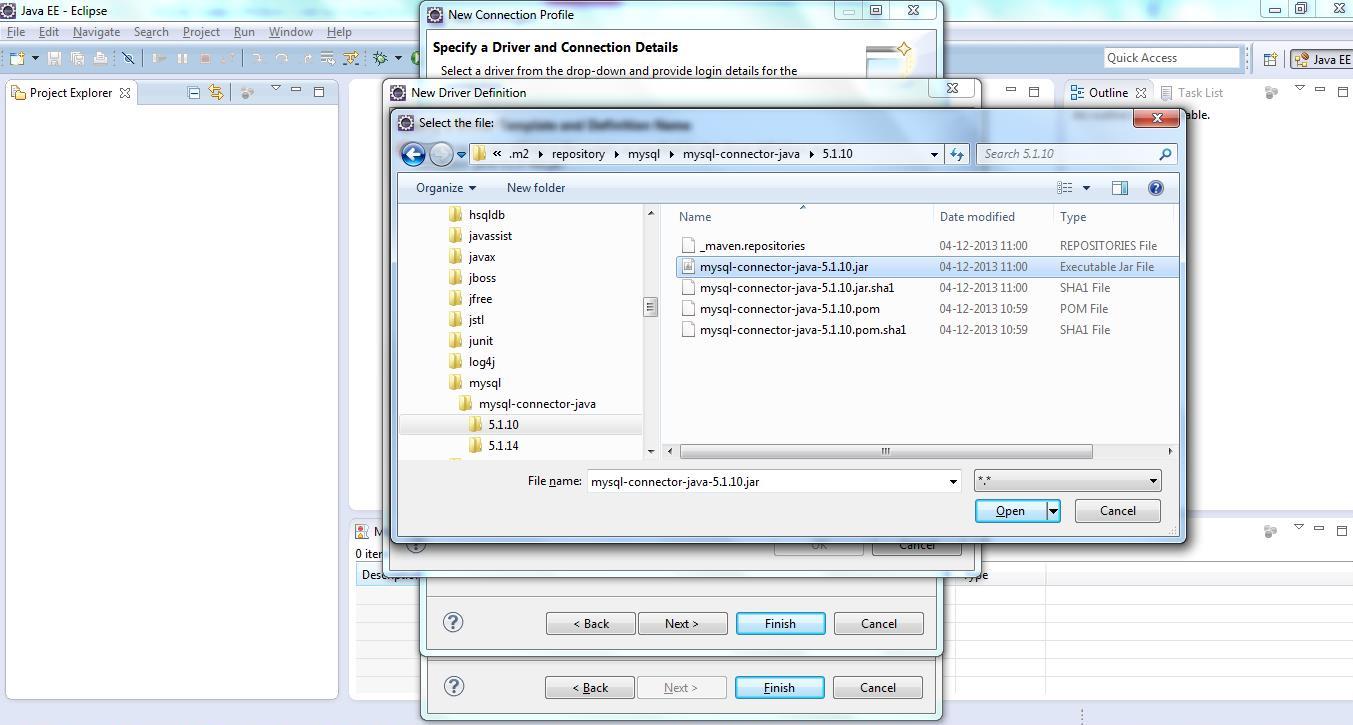 JPA Project & Data Connection for MySQL Step 12
Step 13: The “Specify a Driver and Connection Details” window is displayed as shown below…
 JPA Project & Data Connection for MySQL Step 13
Step 14: Change the database name in the “URL” to local database name in your MySQL instance running in your system… in my case the local MySql database instance name is ‘jb(short for java brahman)”…And then also enter the username/password for your database… the username for my database is the default username “root”. After entering the details click “Next”…
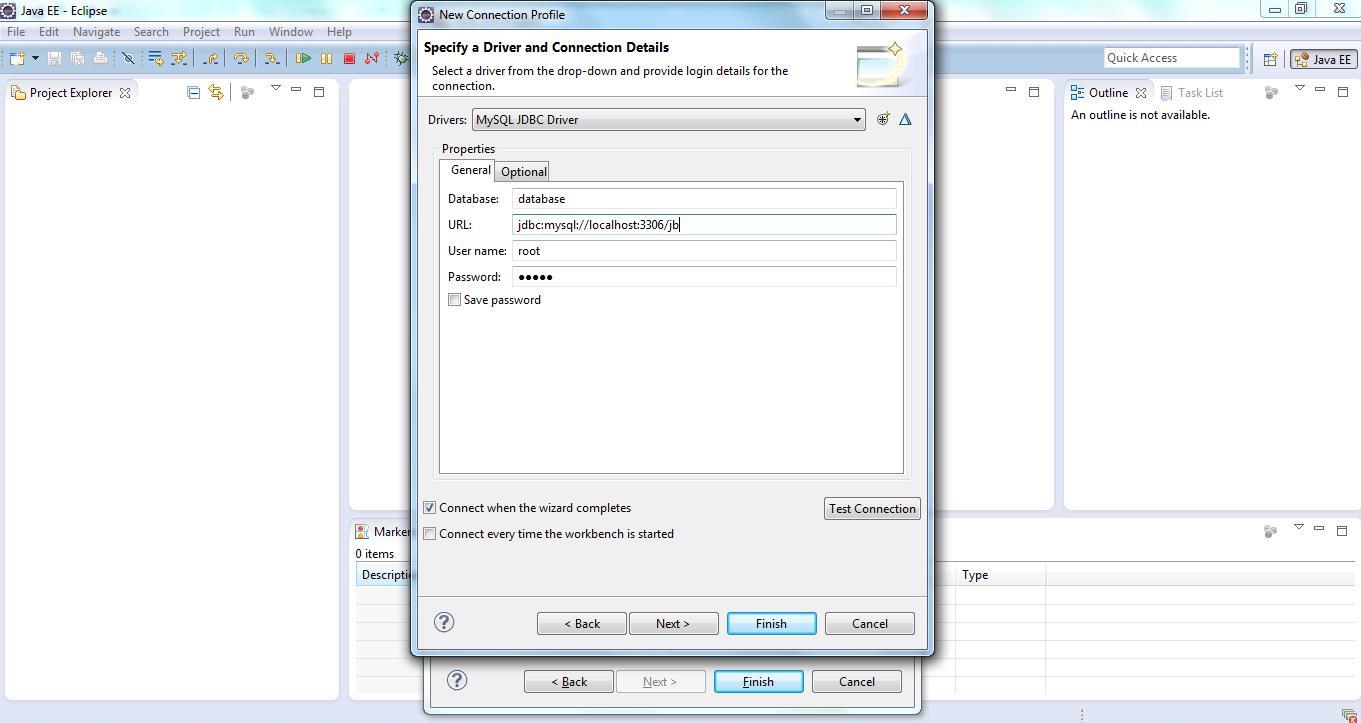 JPA Project & Data Connection for MySQL Step 14
Step 15: Check the Summary and click ‘Finish’...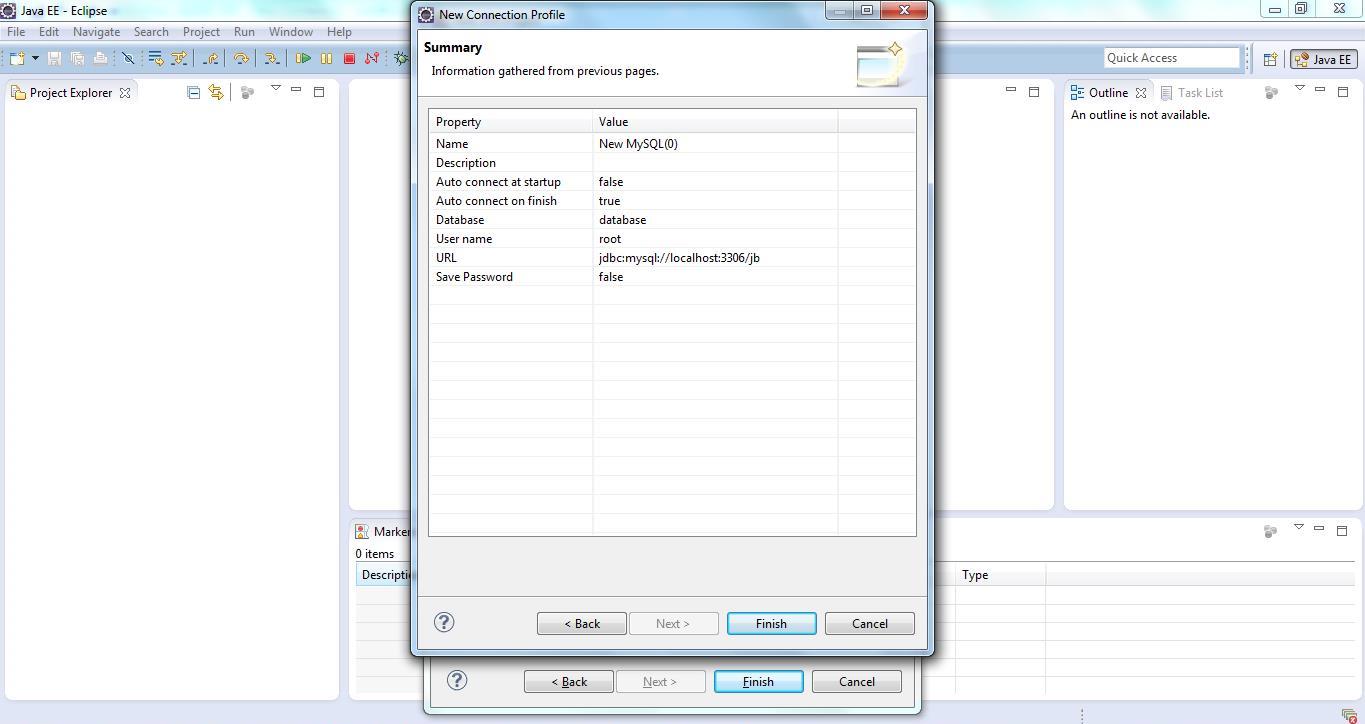 JPA Project & Data Connection for MySQL Step 15
Step 16: The newly created “New MySQL” connection is shown selected in the “Connection” dropdown… Click “Finish” to Finish creating your new JPA Project…
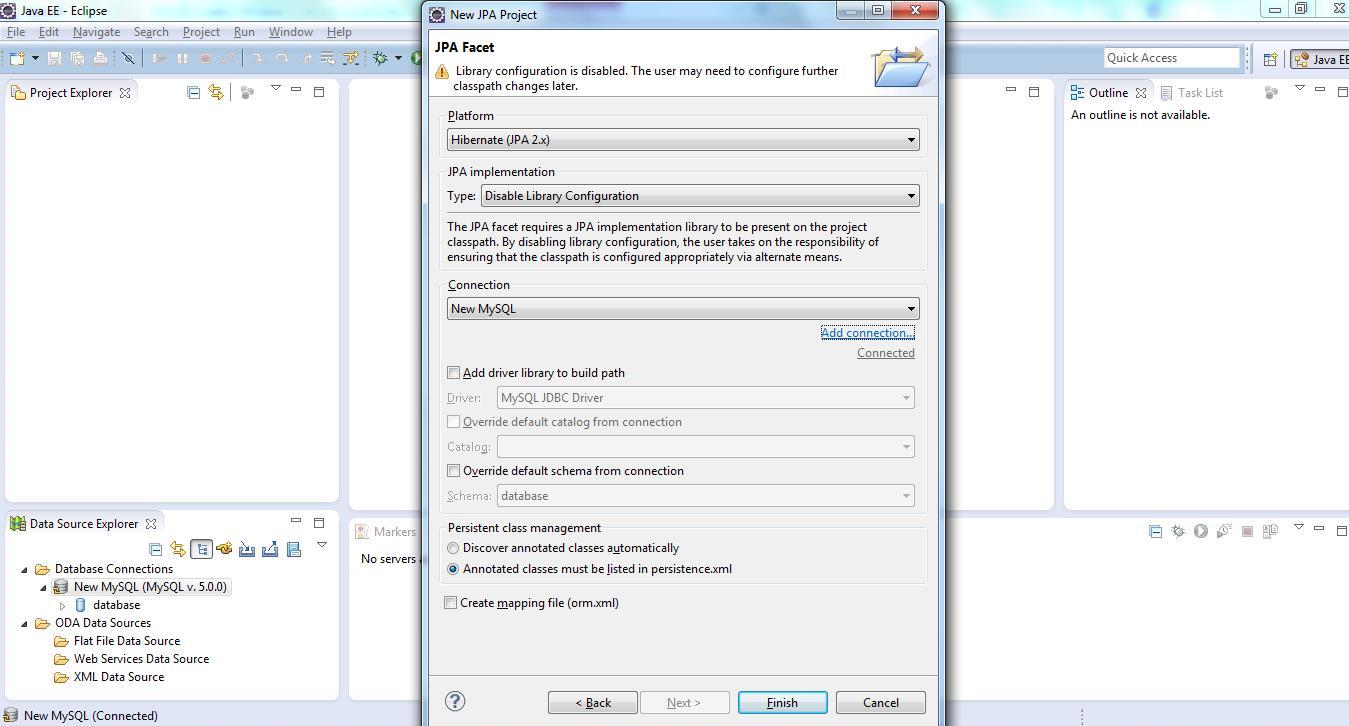 JPA Project & Data Connection for MySQL Step 16
Step 17: The below window shows your newly created JPA Project “StudentDeptCourseProject” in the Project Explorer window with few folders expanded for a better view…Note that the “JPA Perspective” has been enabled…
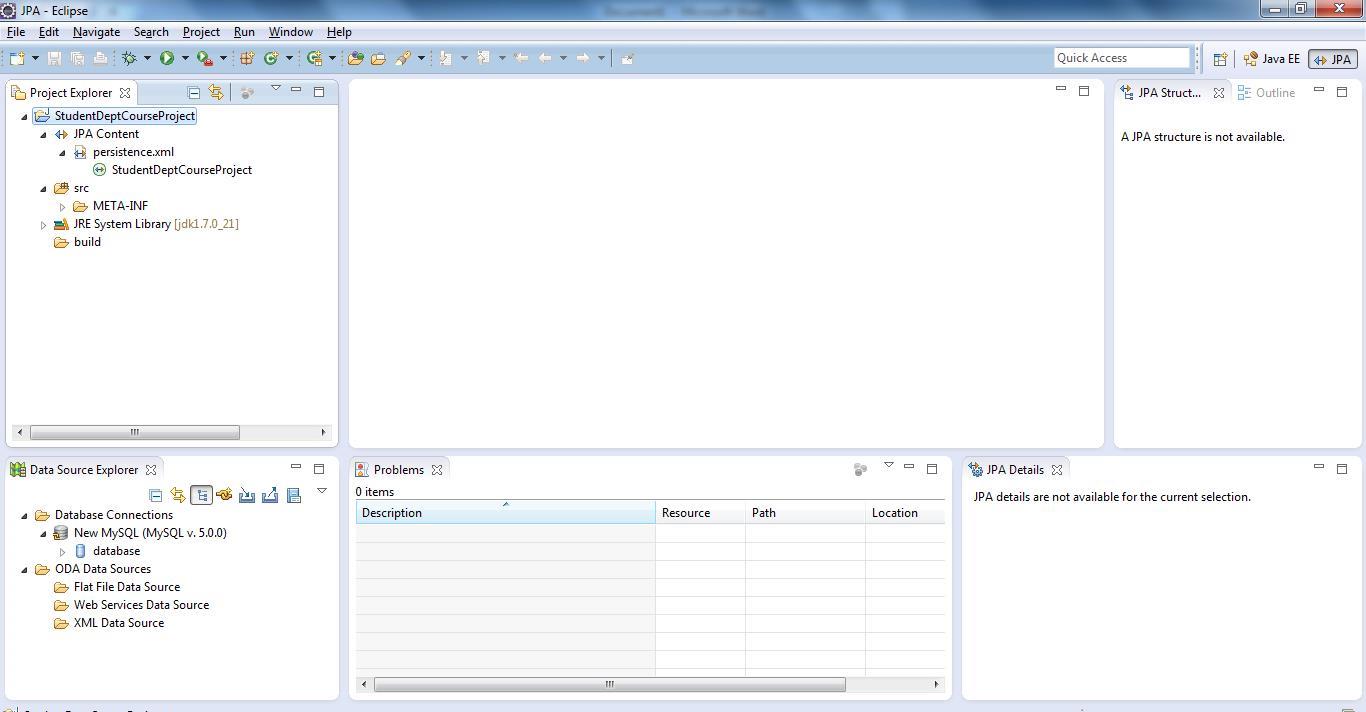 JPA Project & Data Connection for MySQL Step 17
The new JPA Project is succesfully created...
Post the creation of the JPA Project, if your next task is to Reverse Engineer your database tables into corresponding POJOs which are annotated as per JPA Specifications, then you can have a look at this tutorial - Reverse Engineering of JPA POJO Entities from Database Tables. Click to Read JPA Reverse Engineering tutorial
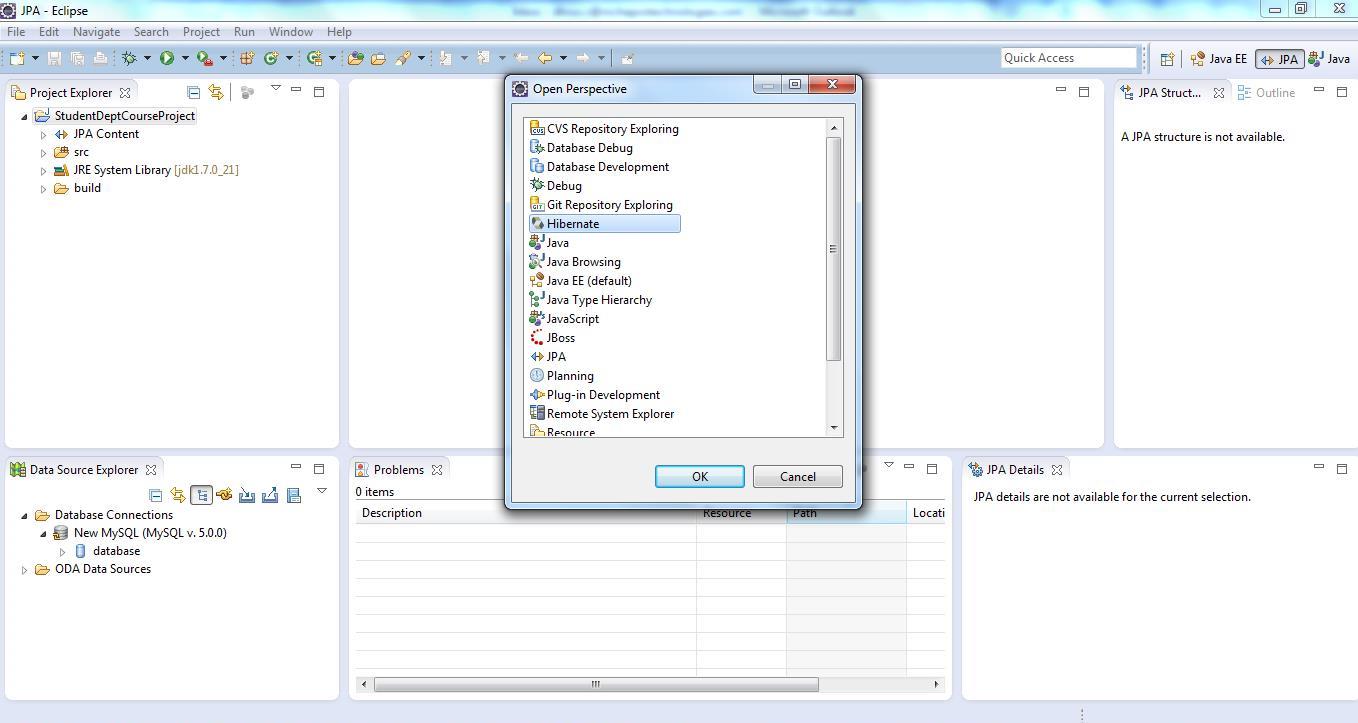
Appendix and Important Note: As part of the JPA Project creation another piece of configuration is automatically created known as “Hibernate Configuration” which encapsulates all the Hibernate\JPA settings. Hibernate Configuration will be used when any Hibernate\JPA specific activity, such as reverse code generation of entity POJOs, is performed. To view the Hibernate Configuration we need to do the following…
Step A: Click on “Window>Open Perspective> Other…”. Select Hibernate perspective and click “OK"...
 JPA Project & Data Connection for MySQL Step A
Step B: Hibernate perspective gets opened on the left side of the screen. Expand the StudentDeptCourseProject tree and its contents are as displayed below...
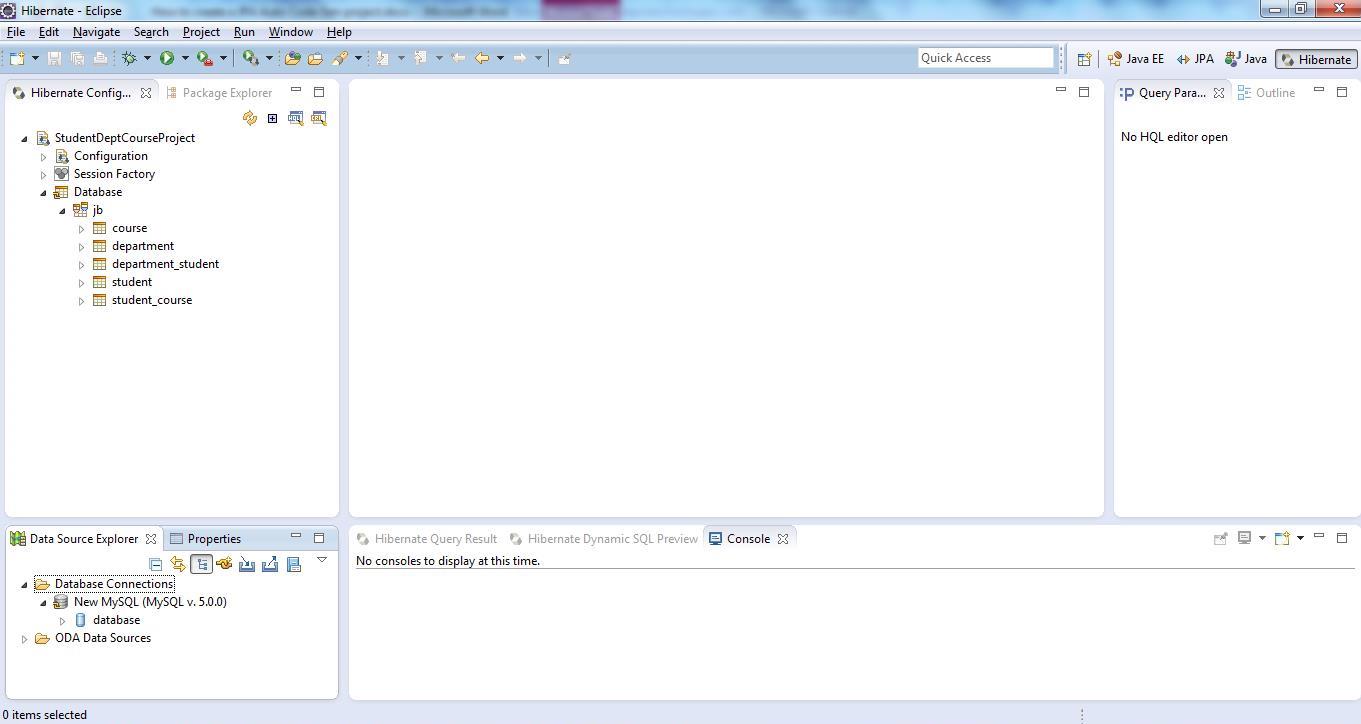 JPA Project & Data Connection for MySQL Step B
Step C: To edit the configuration for the project right-click on the StudentDeptCourseProject in Hibernate Configuration window and click on "Edit Configuration". The following window gets displayed...
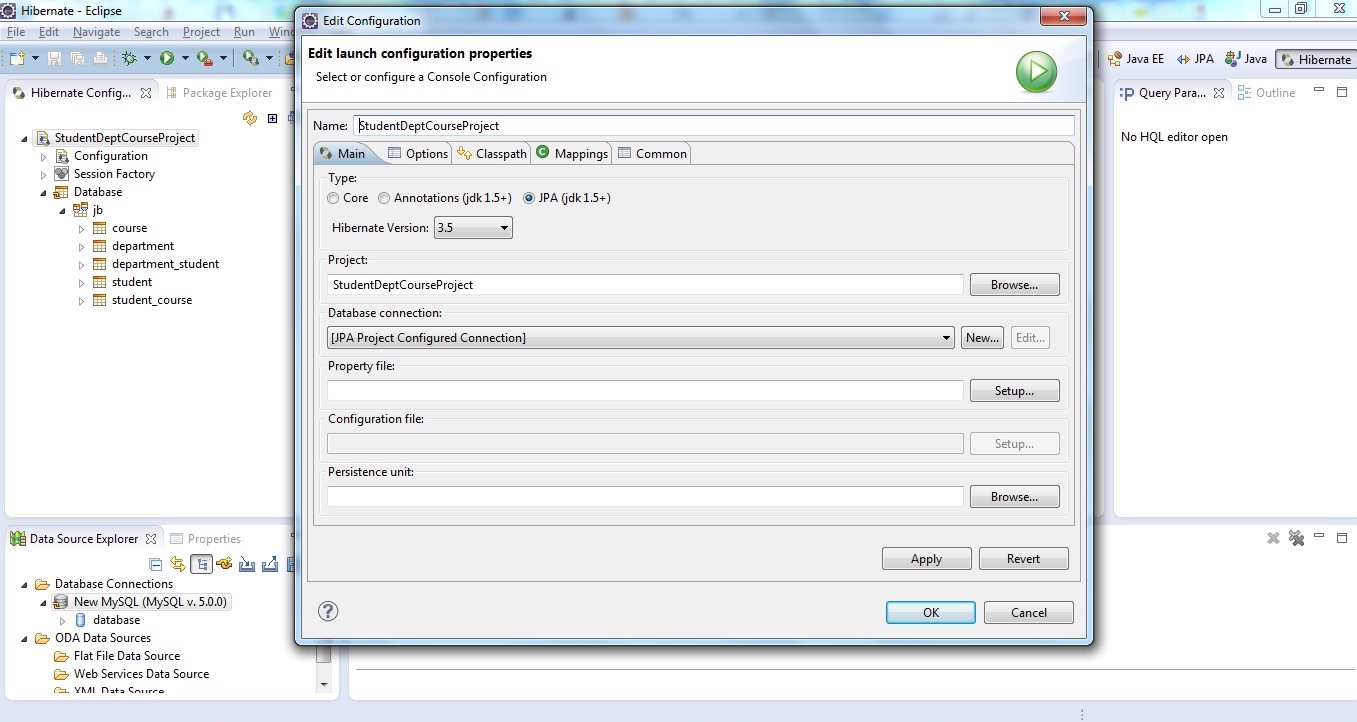 JPA Project & Data Connection for MySQL Step C
In this window various settings related to the Hibernate Configuration can be done such as the Type (Core/Annotations/JPA), Hibernate Version, Database Connection etc.
Note - This tutorial has been created using Eclipse Juno.
Step 1: Click in “File>New>JPA Project”…
JPA Project & Data Connection for MySQL Step 1Step 2: Enter the Project Name. Here it is entered as “StudentDeptCourseProject”. Then select the Target Runtime. In the picture below “jdk1.7.0_21” is shown as being selected. (JDK 7 is set in my windows classpath settings under the variable “JAVA_HOME”) . Then Click on Next…
JPA Project & Data Connection for MySQL Step 2 JPA Project & Data Connection for MySQL Step 3Step 4: The third page of the “New JPA Project” wizard is displayed titled “JPA Facet” as shown below...
JPA Project & Data Connection for MySQL Step 4Step 5: Then select the “Platform” as “Hibernate(JPA 2.x)”…
JPA Project & Data Connection for MySQL Step 5Step 6: On the below page select the “Type” as Disable Library Configuration. This will remove the error shown on the top saying “At least one user library must be selected”
JPA Project & Data Connection for MySQL Step 6 JPA Project & Data Connection for MySQL Step 7Step 8: The following “Connection Profile” page is displayed…
JPA Project & Data Connection for MySQL Step 8Step 9: Select ‘MySQL’ and click ‘Next’
JPA Project & Data Connection for MySQL Step 9Click ‘New Driver Definition’
Step 10: Select MySQL JDBC Driver with System Version as 5.1. Then go to the “JAR List” tab in the same wizard window…
JPA Project & Data Connection for MySQL Step 10Step 11: Click on “Add JAR/ZIP”…
JPA Project & Data Connection for MySQL Step 11 JPA Project & Data Connection for MySQL Step 12Step 13: The “Specify a Driver and Connection Details” window is displayed as shown below…
JPA Project & Data Connection for MySQL Step 13Step 14: Change the database name in the “URL” to local database name in your MySQL instance running in your system… in my case the local MySql database instance name is ‘jb(short for java brahman)”…And then also enter the username/password for your database… the username for my database is the default username “root”. After entering the details click “Next”…
JPA Project & Data Connection for MySQL Step 14Step 15: Check the Summary and click ‘Finish’...
JPA Project & Data Connection for MySQL Step 15 JPA Project & Data Connection for MySQL Step 16Step 17: The below window shows your newly created JPA Project “StudentDeptCourseProject” in the Project Explorer window with few folders expanded for a better view…Note that the “JPA Perspective” has been enabled…
JPA Project & Data Connection for MySQL Step 17The new JPA Project is succesfully created...
Post the creation of the JPA Project, if your next task is to Reverse Engineer your database tables into corresponding POJOs which are annotated as per JPA Specifications, then you can have a look at this tutorial - Reverse Engineering of JPA POJO Entities from Database Tables. Click to Read JPA Reverse Engineering tutorial
Appendix and Important Note: As part of the JPA Project creation another piece of configuration is automatically created known as “Hibernate Configuration” which encapsulates all the Hibernate\JPA settings. Hibernate Configuration will be used when any Hibernate\JPA specific activity, such as reverse code generation of entity POJOs, is performed. To view the Hibernate Configuration we need to do the following…
Step A: Click on “Window>Open Perspective> Other…”. Select Hibernate perspective and click “OK"...
JPA Project & Data Connection for MySQL Step A JPA Project & Data Connection for MySQL Step BStep C: To edit the configuration for the project right-click on the StudentDeptCourseProject in Hibernate Configuration window and click on "Edit Configuration". The following window gets displayed...
JPA Project & Data Connection for MySQL Step CIn this window various settings related to the Hibernate Configuration can be done such as the Type (Core/Annotations/JPA), Hibernate Version, Database Connection etc.